Figure 1. The General tab section of the Session Properties window.
Now that you've learned HTML, you are going to want to create a Web page and put it up on the Web so that the rest of the world can see your handiwork. There are a few things you need to do first before your Web page can set up shop and open its doors on the Web.
Before you can put a Web page up on the Web, you need to find a server to host your page. If you are a student, your school might be able to host your pages. If you are a subscriber to one of the online services, such as CompuServe or AOL, they also might provide some Web space. Your local access provider that connects you to the Internet might also be able to provide Web space to you at nominal cost (or no cost).
However, if you want to create a commercial Web page, hope to generate a considerable amount of traffic, or maybe want to have access to a fuller range of features and services, you might want to consider finding a Web host that specializes or focuses on providing raw Web space. For more info on finding a host for your Web pages, check out these links:
Return to Top.
Your Web host should provide you with FTP access to your Web pages. This means providing you with a user ID and a password, as well as assigning you a password-protected directory on its server where you can store your pages. You might also be assigned an account name, although usually not. This allows you to access your directory (and any directories you create within that directory) through FTP, copying files to or from it, while keeping everyone else out.
Before you can use FTP to transfer Web pages to your Web host's server, you need to find out the following information from your Web space provider:
Return to Top.
To transfer your Web pages from your local computer to your server, you need to use an FTP program. The following examples all use WS-FTP LE for Windows 95, version 4.5, which is available on the CD-ROM that comes with this book. Earlier versions of WS-FTP LE should all be quite similar, except the arrangement of the Properties and Options menus might be somewhat different. Other FTP programs should work similarly, although I can only vouchsafe here for WS-FTP LE.
If you don't have a CD-ROM drive, you can download WS-FTP LE directly from Ipswitch, Inc.'s Web site. It is free to qualified non- commercial users.
I am assuming that you have a connection to the Internet, that you have been provided or have rented some space on a Web server to store your Web page, and that you have password protected access to your directory. I'm also assuming that you know the information detailed earlier under "A Few Things You Need To Know" and that you have installed WS-FTP LE.
Run your winsock dialer to log onto the Internet; then, after you connect to the Internet, run WS-FTP LE.
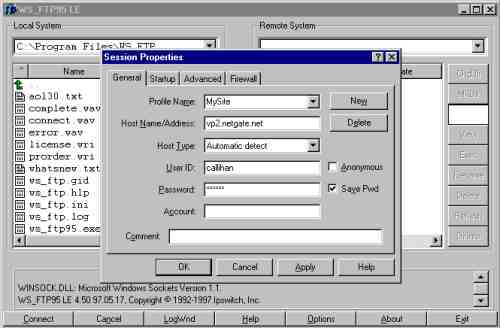
Figure 1 shows the opening screen of WS-FTP LE for Windows 95, version 4.5, displaying the General tab section of the Session Properties window (earlier versions of WS-FTP LE might combine the General and Startup tab sections in one window).
Figure 1. The General tab section of the Session Properties window.
Follow the steps outlined in the subsequent sections to define a new session profile:
CAUTION: If you are on a network, you should be aware that checking the Save Password check box will save your password to your hard drive in an encrypted form. It is, however, not difficult to unencrypt for someone who is determined to do so--a hacker, for instance. If you don't save your password here, you must type it in each time you use FTP to log onto your Web server.
Refer back to Figure D.1 for an example of how your filled-out General tab section should look (substituting your own information, of course).
Click the Startup tab.
NOTE: This is increasingly rare, but some servers may connect you to their root folder, from which you then may have to open a "users" folder, your own user folder, and so on. If this is the case, you can include in the Initial Remote Host Directory box the folder path from your server's root folder (or whichever folder it defaults to) to the actual folder you want to automatically open.
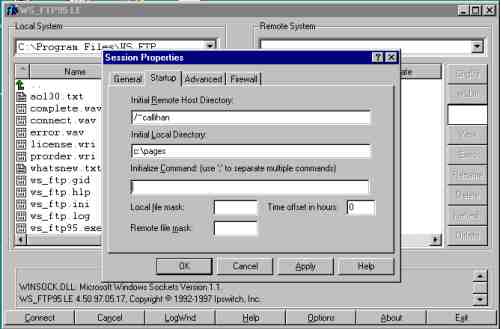
Figure 2. The Startup tab section of the Session Properties window.
Click the Advanced tab section.
You only need to change any of the settings here in case the default settings don't work. For instance, if you're having trouble connecting, you might set the number in the Connection Retry box to a number between 1 and 40. You could also increase the Network Timeout entry if you are timing out before being able to connect. Lastly, a port number other than 21 (the standard port number for an FTP server) might need to be set in the Remote Port box, although this is unlikely. (See Figure 3.)
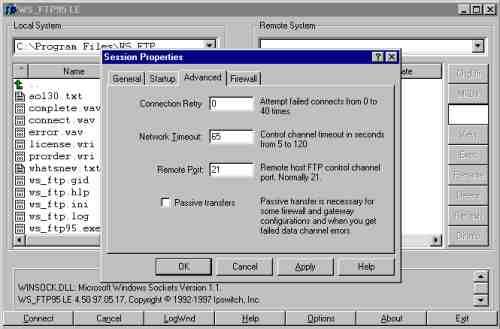
Figure 3. The Advanced tab section of the Session Properties window usually should be left "as is."
There is no need to fill out the Firewall tab section, unless your Web directories are located behind a firewall, which is unlikely. If you do need to fill out this section, find out from your Web space provider the information you'll need to provide here.
Now, if you have logged onto the Internet and all your settings are correct, just click the OK button to connect to your server. Figure D.4 shows WS-FTP LE's main screen once it has connected with and logged onto your Web server.
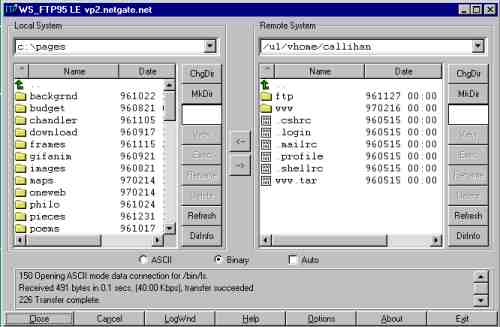
Figure 4. Once you connect to your server, WS-FTP displays your local directories on the left and your directories on your server on the right.
If this hasn't worked, you'll need to go back to the drawing board. You may need to specify a specific host type (you'll probably have to e-mail your Web host to find out what this is). Make sure that the host name of your Web server is correct. You should double-check that your user ID, password, and account name (if you have one) are correct. Another possibility is that your Web server is using a nonstandard port number (other than port 21) for FTP access; to change this, click the Advanced tab section, enter the correct port number in the Remote Port box, and then click the OK button. If it still doesn't work, under the same Advanced tab, try increasing the Network Timeout amount or the number of connection retries. If none of this works, you'll just have to check with your Web host to make sure you're using the correct user name, password, and so on. Also make sure you have the right directory path or directory alias.
Note: The whole battle of being able to use FTP to update your Web pages on your server is simply getting these settings correct. So, make sure you find out from your Web space provider the exact settings you need to provide here. Once you get them right, it is pretty much easy as pie. (But it's pretty much pie in your face until you get them to work correctly--so be patient if you can't get this to work right off the bat.)
Return to Top.
Once you connect to your directories on your server, WS-FTP LE's main screen is displayed in the form of two side-by-side windows. The window on the left shows the local folder (directory) on your hard drive that you specified in the Initial Local Directory box under the Startup tab. The window on the right shows the directory on your Web server that you specified in the Initial Remote Host Directory box, also under the Startup tab.
As you'll notice in Figure 4 (earlier), the remote host directory that I log onto on my Web server contains two directories, the ftp directory and the www directory. My Web pages are actually inside the www directory. If this is also the case on your server, go ahead and double-click the www directory[md]or whatever other directory name that is being used to contain your Web directories. (See Figure 5.)
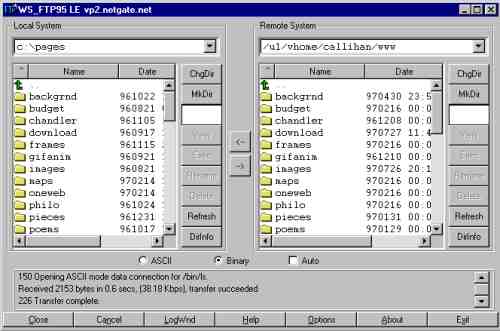
Figure 5. Your Web page directories may be inside a "www" directory on your server.
You'll notice that I have quite a few directories already set up in the right-hand window. That's because I've been a busy chipmunk and have managed to create quite a few Web pages. In order to keep track of them, I have organized them into separate directories. Because you're just getting started, you might not have any directories or files set up yet, unless your provider has already created some sample directories or files for you.
Tip: You'll also notice that the directories on my Web server match the directories on my local hard drive. When creating Web pages on your local hard drive, you want your directory structure to match exactly the directory structure you'll be using in your Web directories. That way, if you always use relative URLs to link to other files internal to your own site (strongly recommended), you can fully test out the links in your Web pages on your local hard drive and then transfer your Web pages to your Web server without having to reset any of the links.
Navigating WS-FTP's main window, you can do the following:
Be patient. If you are copying several files, or if any of them are at all large (such as a banner graphic file, for instance), it might take a minute or so before the files have been transferred.
One gotcha that is easy to trip over when transferring files from your PC to your server is the case-sensitivity of filenames on Unix systems. Thus, Whacko.htm and whacko.htm on a Unix system represent two different files. To avoid this problem (getting the wrong case), I set WS-FTP to force lowercase filenames when transferring files to my server. I then make sure that all my hypertext links in my Web pages are also all lowercase. To set up WS-FTP to do this, first log onto your server (or any FTP site); then in the WS_FTP LE window, follow these steps:
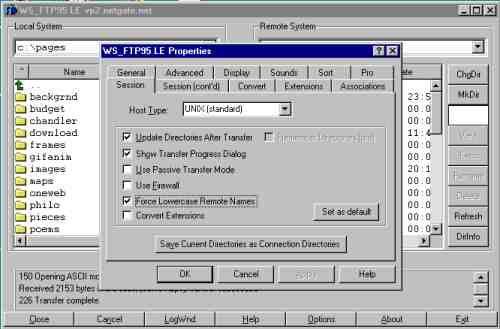
Figure 6. You can force all files transferred to your Web server to be converted to all lowercase letters, which will keep you from tripping over Unix's case sensitivity.
When you are through transferring files to or from your server, you should always close your FTP session before exiting WS-FTP. To do this, just click the Close button, wait for the "Goodbye" message to be displayed in the lower activity window, then click the Exit button. After exiting WS-FTP, go ahead and log off the Internet, if you wish.
Return to Top.
WS-FTP LE by Ipswitch, Inc.
URL: http://www.ipswitch.com/
E-Mail: sales@ipswitch.com
Phone: (617) 676-5700
Fax: (617) 676-5710
Other products by Ipswitch, Inc.: WS-FTP Pro (professional version), VT320 Telnet Terminal Emulator (DEC VT320 terminal emulator and Telnet communication program)
Return to Top.
Return to Learn HTML In a Weekend.
Return to Learn HTML In a Weekend (Revised Edition).